Monday, April 23, 2012

A few words about the Ma & Pa's roadbed profile..

My new friend Dick Bradley, who is far more knowledgeable about all things Ma & Pa than I, brought up a point for me to ponder in his comment on my last post.  I'll reprint what Dick  wrote:

"Midwest HO cork roadbed is about 18 scale inches high. Below it the width of the camper tape makes a proper sub roadbed. How will this height of cork relate to Ma & Pa practice? Check the photos in Hilton, specially page 97. Should the cork be eliminated and the flex track go directly on the camper tape?
Dick Bradley"


If you look at some of the pictures in Hilton's book, especially the one on page 97, it sure looks to be the Ma & Pa's practice to lay track almost on level ground with barely any drainage considerations.  I've been working on the assumption that there had to be some elevation, even if it's not as much as other class one railroads.  In fact I've been making my assumptions based on the Maryland & Pennsylvania RR Plan Book Vol. 2 that I purchased from the society. 


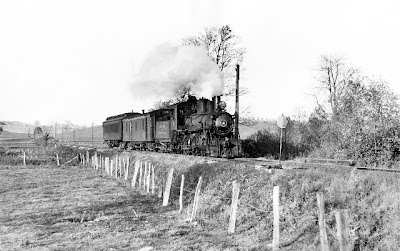
Pages 72 and 73 show M&P standards for both crushed stone and cinder ballast and track profiles.  If you go by a tie thickness of 7" it looks to be 7-9" of stone or cinder under the ties.  Does this mean the Ma & Pa stood by what could be a best case scenario as far as how they actually kept their roadbed?  Again, going by the picture on page 97 in Hilton's book and a lot of others, probably not.  But take a look at some of the following pictures and you will see some semblance of a raised profile on some sections of the railroad..


#6 Bryansville pa. Stone ballast and a slight height difference can be seen.


#6 Pylesville Maryland, a raised embankment is very noticeable here.


#62 backing down the Dallastown Branch, again, a raised profile with decent stone ballast roadbed is evident.

I think once I start adding the slight dips and scenery contours to the layout (remember I only have flat styrofoam down at the moment) you'll see that most of the scenery will at least be level at track side with the top of the camper tape, and any height variation will be where there is cork. 

In the yard at York everything will defintely be flat.  I bought sheets of cork to use in the yard, and the track will look like yard trackage, oil, dirt, grime, just the hint of what used to be cinder ballast.. You get the picture.

Thanks to Dick for making me go back and evaluate what I'm doing here.  I value his input and he's turning out to be a good Devil's advocate and keeping me honest. :)

Also, thanks to the photographer's who's work I've used as examples above.  If anyone knows who's pictures these are (Charles T Mahan maybe?) I'd like to give them proper credit.

Epiloge:  Dick Bradley came up with the name of the photographer of the prototype photos.  Here is what he said:

"Hi Ted: The photos of #6 at Bryansville and at Pylesville were taken by Wm. Moedinger, Jr. and most recently appeared in the Summer 2010 issue of the Ma&Pa "Timetable"
The photo of the train backing up the Dallastown branch is of a steam engine, a baggage/mail and a coach. It is not # 62. I suspect it was taken by Wm.Moedinger and is the same train seen in the other photos." Dick Bradley

Thanks Dick for the photo info!
Sunday, April 22, 2012

Just because it's quiet doesn't mean I'm not making progress..

When it gets to be long intervals between posts it can only mean two things: I'm goofing off (I blew through all the levels of Angry Birds Space already so that's not the case) or I'm getting a lot of work done and have no time to blog.. which I'm happy to report is the case. :)

Here is what I've been able to accomplish in the time since my last post:

I worked on how to secure the movable helix to the layout.


I drilled out the connecting plates on the helix to match the bolt holes already present on the layout section.  These holes are at a standard location on every section so the helix can be bolted theoreticaly to any of the other sections in the future if need be.

Here we are looking from underneath the section the helix is bolted to.


Here is the same bolted connection looking from inside the helix.

I finished laying down the camper tape (topper tape) on both levels of the layout that connects directly to the helix, and then I laid down the cork roadbed on top of the tape on the mainline sections.  I will not be putting cork on the industrial sidings so that I have a slight track level difference like you would see on the prototype.


Cork roadbed laid down on top of the camper tape on the lower level.


Cork roadbed being laid down on the camper tape on the upper level.


I can't go to much beyond this point with the roadbed because I'm out of cork and have an order in for more, plus more flex track, with The Model Railway Post Office.  Once it's delivered I'll move on to the other sections along the back wall.

The last thing I worked on this week was to work out a design for the two bridge sections that span the distance between the two wall sections.  These bridge sections need to be removable so I can access the sump pump room in case of emergency.


The lower level bridge goes in.  The door to the pump room is visible behind the bridge section.


Both levels are in on the bridges.


It was a productive week, though not without a few hiccups (repeat after me.. measure twice cut once..AGAIN.. measure twice cut once..AGAIN..) But I had fun and I'm starting to see measurable progress.  I don't want to jinx myself, but I am shooting to start having some shake down sessions (I know Marty, you call them sea trials..) by the middle to end of this summer and I think there is a good possibility of obtaining that goal.  I can't wait!

Friday, April 13, 2012

Helix reaches the end.. or.. How's that for a topper?

We just returned from a fun trip to the Inner Harbor in Baltimore, MD and to Alexandria, VA where we met up with Amy's friend, who she hadn't seen in 26 years!  We had a great time though I wish we had more time in both Baltimore and Alexandria.  I didn't make it to the B&O Museum, but I did get to indulge in another passion of mine: we toured the Historic Ships of Baltimore, the Constellation, The Light Ship Chesapeake, the submarine Torsk, and the Coast Guard cutter Taney.  We were able to board and wander around each ship, and we had a great time exploring these wonderful vessels.  If Model Railroading wasn't already my favorite hobby, ship model building definitely would be. 

Today, being the first full day back, I picked up where I left off on the layout just before Easter.  I was able to bend and lay the rest of the flextrack needed to finish the helix, plus I installed the team track siding at Yoe, PA.  All I need to do now is glue down the track and start dropping feeders. (Come on Duncan! Please get the battery operating system out soon before I really have to wire this thing! :)

We reach the end of the line finally on the helix.


The team track siding at Yoe, PA

I also started working on the roadbed for the upper deck.  I'm trying out camper tape with cork glued on top.  I read an article by Bob Kingsnorth, in the How to Build Realistic Reliable Track special issue published by Kalmbach a couple of years ago.  He experimented with all kinds of roadbed combinations to see what would be the most quiet.  Camper tape (or topper tape, as some in the hobby press call it) with cork roadbed glued on top, was the quietest combination.  Personally, I think Bob way over thought this, (Just the type of thing to put you in analysis-paralysis) but hey, he did the work so I'll just go by what he found.  I definitely want something that will deaden the sound due to the fact that extruded styrofoam sub roadbed and gatorfoam transmit a lot of noise.

I used 1 1/4" wide camper tape and laid it two strips wide to make a 2 1/2" wide base.


I test fit the curved section coming off the helix. The camper tape will get cork roadbed glued on top of it.  I will just use the camper tape with no cork on the sidings to help give a slight elevation difference.


I'm looking forward to seeing whether the camper/topper tape-cork combination really works.  I'll keep you posted..

Sunday, April 1, 2012

28 makes the grade..

Track is in on over 80% of the helix so I decided to hook up power and see how #28 handled the track-work and grade.  She ran well and once the rest of the track is in I'll permanently wire it and fine tune the turnouts and track.