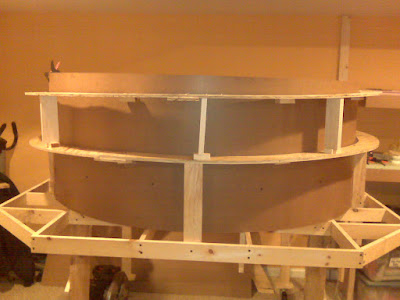
Every time I've looked at the helix over the past couple of weeks since the work session, I've sensed something not right with it. I started to lay out the next sections and came to the realization that the last loop wasn't going to be quite at the right height to meet up with the top deck. But why? I did the math, and 4 loops at the given radii and height separations should have gotten me there with a little extra wiggle room too.
As I started rechecking what we did, I noticed that some parts of the loops looked steep and some looked level. I ran my torpedo level over the inclines, and indeed there were places that were perfectly level (in fact one spot on the inner loop went downhill for a short distance) so the problem seems to be that we didn't get a consistent grade going up the first part of the helix as we built it. I think part of the problem is the type of helix this is. It's hard to gage how it's going when one loop is basically on the other side of a wall (the backbone). Going into the whole process of trying to build this type of helix I knew I would be flying in the dark, not having any reference material to work from as a guide, and I would have to try to get it done by trial and error.
Just like any other type of helix design you need to get the first loop perfect, then theoretically the next loops should line up perfectly. What I need to do is unfasten the first two loops from the backbone and adjust them. While I contemplated doing this I was drawn back to one of the ideas I had when I originally was thinking about how to build this type of helix, and that was to connect all the levels from bottom to top, then starting from the top, work backwards, and adjust each level till I had the right grade and level separation.
First I re-did some math to help me determine how to set my grades: the formula I used is Rx2x3.14 (pi) to determine the length of the run of an entire loop. In the case of the outer loop it worked out like this: 34" radius x 2=68x3.14 (pi)= 213.52" circumference. When your figuring out grades you figure it this way: Gradient(%) = Rise / Run. In other words a 1% grade then is: 1 inch Rise in 100 inches Run. In my case I needed a 4" separation where the inner and outer loops cross. This should work out to be a tiny bit over 2% so in 100" of run on the outside loop (a tiny bit less than 1/2 way around) I need that side of the loop to be 2" higher than the starting point on the other side of the loop. I marked the 100" mark on the backbone for reference on the outer loop so I'd know where to measure for the 2" difference.
I then did the math for the inner loop 30"x2x3.14 (pi) which gave me 188.4" circumference. I marked the 100" point on the inside loop which was approximately just over the half way point (94.2" is the official half way point). The inside loop, because of the tighter radius works out to be a steeper grade, but still comes in at just under 2.25% which is acceptable.
I connected the very top loop to a riser that is the height of the top deck and started working my way back from there. Knowing I need to be 2" lower at the half way point allowed me to get the grade more even. I attached temporary 8" risers under the roadbed so once I have the whole loop where I need it, it's just a matter of raising the next outside loop to the bottom of the temporary risers to get that level at the right gradient. I only got the first upper loop done, but I will also do the same process for the inside loops.
 |
| Here you can see the temporary risers. Once the top and bottom outside loops are at the proper height and grade, I'll fasten them to the backbone and remove the temporary risers. |
I'm hoping this is the fix, and that the helix will be done on the construction side soon. I can then lay down some track, and test it out to make sure everything works out the way I want it too.
Today I also took an inventory of all the Fast Tracks turnouts I have built to date to see how many more of each type I need to build. I figured out I need 3 more left hand and 5 more right hand turnouts. I started cutting and laying out the pieces I need to build two more in my #6 turnout jig.
 |
| My entire inventory of right and left hand #5 and #6 turnouts built with my Fast Tracks jigs. |
I also have 10 Central Valley #6 flexible turnout kits that I haven't had the courage to try and build yet. I had bought them for a good price and I know I need at least one curved turnout. I might try and tackle one this week. I'll let you know how it turns-out. Hey! A model railroad pun! ;)


Mmmmmm, pi................
ReplyDelete